Sunday, December 31, 2017

Seasons Giving Blog Hop Year Six!


Wow, if you made it this far, know that you are at the bottom of the list!  I am joining along with a wonderful group of crafters in the sixth annual Seasons Giving blog hop.  This blog hop is a way for designers and companies to thank our readers and EVERY SINGLE ONE is giving something away!  Check it out!  Since I am the very last one on the list and I know that my life will be CRAZY through the first of the year, my give-away will be open until January 9th at 12 noon Pacific Standard Time.  I will contact the winners by January 13th for shipping information.  Please make sure I have a way to contact you!

Welcome to my blog if you have not been here before!  I am a paper crafter, stamper, card maker, scrapbooker, and Bible Journaler who also dabbles in home décor, sewing, and gardening.   


My goal for 2017 was to submit for publication, and I was fortunate to have several cards published in Take Ten  along with a single card and one card in Stampers Sampler.  Click the links to read all about it!

Here are a few of my blog posts that had high interest during 2017.   


A Guest Design gig for Great Impressions was the most popular post of the year.   


A Retro Rubber card created for a new baby was second. 


Followed by a Guest Design post for Joy Clair in third. 

Some of my favorite projects from 2017 include: 


 Two cards stand out, both created for Retro Rubber, a wedding card,

 and a very recent Christmas card. 

Click the links to read the original posts for design tips and supply lists.

Thank you so much for stopping by and checking out my blog and giveaway!  Here’s the details:
1.   Become a follower using the link to your left.
2.   Subscribe by email if you want creative joy to land in your inbox!  (FYI I recently had to cancel my feedburner and re-start the subscribe via email as there were over 1000 bogus email addresses listed!  Yuk!)  So even if you have subscribed before, you may need to re-subscribe. 
3.   Share with me what your goal is for 2018 . . . mine is to get more scrapbooking done!  I have a senior graduating from High School in June and would like to have a more than a few High School layouts for his senior party! 

For my United States readers this is what will be in the package!


For my International readers I will mail the following to you!


Here is the lovely list for this great Blog Hop:


You are here!--> Neva Cole <--You are here!

Remember to become a follower and leave a way to contact you, subscribe via email, and share your crafting goal for 2018!

Saturday, December 16, 2017

Easy Christmas Candles


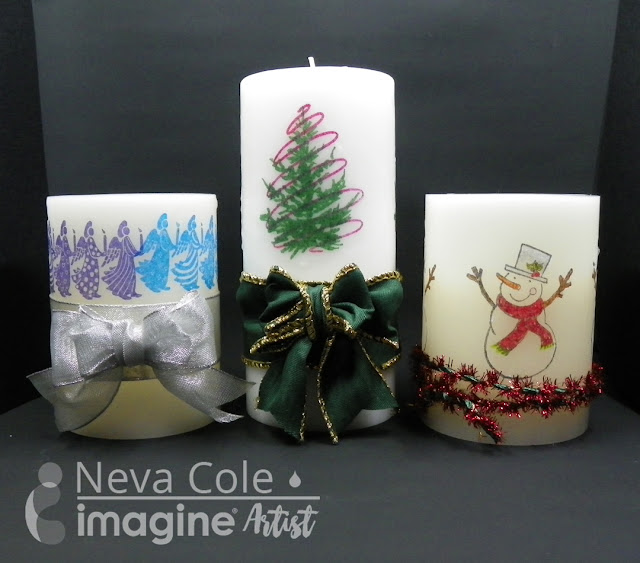
This project originally started out as the Evergreen challenge for Imagine . . . and morphed into much more than that!  Very simple and quick to create, and a great hostess gift as well.  You can use regular candles, or the LED wax version.  The tall Christmas Tree pillar candle is the real deal wax candle.  The images are stamped on white tissue paper in StazOn Forest Green and Blazing Red and then gently fussy cut.  (Note, you might want extra paper under the tissue paper as the ink WILL bleed through.)  Place the image in desired position and gently heat with a heat gun.  Smooth the tissue paper down into the melted wax and smooth edges of wax with fingers.  The tissue paper becomes translucent in the melted wax.  The snowman and angel candles are both the LED versions.  The snowmen were stamped in StazOn Jet Black and colored with Fabrico markers.  The images were die cut with a layer of cardstock underneath to cut the tissue more cleanly.  The images may be reversed when applying to the candle as the color is equally vibrant on both sides.  The angels are stamped in StazOn Royal Purple and Azure.   All three candles are finished with decorative trim or ribbons with bows.  


Imagine

Other
Wax or LED candles
DeNami Designs—Small Tree, Small Tree Swirl
Hampton Arts—Let It Snow Snowmen
A Stamp In the Hand—Angel Parade

This will be my last post as an Artist in Residence for Imagine.  It has been a wonderful journey!  Thank you for all your support!

Monday, December 11, 2017

Snowy Mountain Card

Did you know that it is International Mountain Day?  Well it is!  This is a representation of one of my most favorite mountains, Mount Hood in Oregon.


This is a scene I truly would enjoy gazing upon . . . Mount Hood in the distance with a few deer peeking out through snow covered evergreens.  I do get to see deer in my yard on occasion hiding among the trees, and I can see mountains in my home town, just not out my front window!  So, this is a fantasy scene created just for our Winter Window challenge over at Imagine.  Learn how to make your own window frame using a wood grain stamp, Tear It! Tape and Kraft cardstock to surround a multilayered outdoor landscape. 

Level:  Intermeadiate
Time:  90 minutes

Step 1


Stamp foreground images in StazOn Saddle Brown on white cardstock and die cut.  Scribble Memento Dual Tip Markers on craft mat along with a spritz of Ink Potion No. 9 and water color images. 

Step 2

Stamp Mount Hood image in StazOn Saddle Brown on 5” x 6 ½” Bristol Board card base and water color.  I choose to use Pistachio and Olive Grove in the foreground and Danube Blue for the sky.  Most of the foreground will be covered.

Step 3


Stamp woodgrain image in Memento Rich Cocoa on a 3” x 11” section of Kraft cardstock.  The image is not designed to line up, so I used a Memento Dual Tip Marker to draw in lines to finish the look.

Step 4


Trim Kraft cardstock into ¾” strips and score the back 1/8” from each edge.  Die cut the center from Kraft cardstock trimmed to 5” x 6 ½” to make the supporting window frame.

Step 5


Apply Tear It! Tape to all four sides of the base frame.  Fold edges of each section back on scored lines trim to fit the frame.  Adhere each section to create window frame.

Step 6


Arrange and adhere die cuts to create desired scene.  The background images are adhered directly to the card base, the middle images have one layer of thin dimensional foam adhesive, and the foreground images have two layers of thin dimensional foam adhesive.  Take care to avoid adhesive around the edges where the frame will be placed.  Trim images that overhang the scene.

Step 7


To add a bit of shimmer to the scene, color snow sections on mountain with Versa Marker and heat emboss with Iridescent embossing powder.   When I view snow-covered mountains from a distance they seem to have a bit of a glimmer.
 
Step 8


Add bits of Radiant Neon Amplify! on the scene to mimic a light covering of snow in the foreground, and a snow topped mountain in the background.  Heat to cure and puff up the Amplify!  Adhere frame over the scene. 

Imagine

Other
Bristol Board
Kraft cardstock
White cardstock
Rainy Day Stamps—Mount Hood Large (Vintage, other similar images available)
Heartfelt Creations—Woodsy Critters stamp & die set, Woodsy Wonderland stamp & die set
Unity Stamp Company—Grainy Background
Elizabeth Craft Design—Stitched Rectangles
Fine tipped paint brush


Saturday, December 9, 2017

Snowy Mittens!

The challenge this month at Imagine was "Let it Snow!"  Here is my take:


Delicata is the perfect ink to create a Let It Snow Flip card, or in my case Warm & Cozy Wishes while surrounded by snowflakes! In order to make this card, you will need the Sizzix Framelits Flip Its 660022 or one similar to it from Sizzix. There are several video tutorials on how to use this die and once you have a handle on how to construct the card then the rest is easy!

The mittens and cuffs are stamped and heat embossed with clear embossing powder and die cut, then placed over the stamped mitten image. The snowflake background is created by stamping with Delicata White Shimmer and heat embossing with clear embossing powder. Delicata Sapphire Blue is applied over the entire area with an Ink Blusher then the ink is buffed off the images with a paper towel.

The background behind the mittens and the small snowflake die cuts are simply stamped in Delicata, the shimmer of the ink does the rest! Ink blusher applies ink around the edges of the card in Delicata Silvery Shimmer, and behind the circle in Delicata Sapphire Blue.

By using just three Delicata inks, a bright and beautiful coordinated flip card is fun to create. I hope your holidays are warm and cozy!

Imagine

Other
The Stamps of Life—Mittens2stamp and die set, Patterns4mittens
Sizzix—Framelits FlipIts 660022

Thursday, December 7, 2017

One more in the Take Ten Winter issue

In all my excitement a few weeks ago I neglected to share that I had one more card make the pages of the winter issue of Take Ten.  I was reminded today when they graciously sent me an email along with link to my cool badge over in the right column.


This fun card uses three inks, one marker, vellum, white cardstock and one stamp and die set.  Super easy and definitely made in less than 10 minutes!    

Tuesday, December 5, 2017

Festive Christmas Colors

We have a very seasonal challenge at Retro Rubber Blog Challenge!  Check out the cool creations of the design team.


For this challenge, I had my heart set on using an Altenew set called Poinsettia & Pine from 2015.


I started by stamping all the images in Memento Luxe Tuxedo Black and heat embossing with clear embossing powder.  I tapped a bit of Fireworks! spray on my craft mat and did a bit of water coloring with the pretty sparkly sprays.  I used Rhubarb Stalk, Bamboo Leaves, and Desert Sand.  To change up the color at bit I added in some Northern Pine Memento Luxe ink to the green and Peanut Brittle into the Desert Sand, this a really great way to expand your color palate.  A bit of shimmer vellum was pressure embossed with Cuttlebug Polka Dots backs the images.  The spare piece that was trimmed off becomes strip to complete the sketch and add the sentiment.  Olive Green Memento Luxe with iridescent embossing powder stamp the sentiment by The Stamps of Life to finish off the card.  

Have some fun and join us at Retro Rubber with your own Christmas color project!

I would like to enter the following challenges:


Monday, December 4, 2017

Stick It Down Double Page sketch for Halloween

It is time to share my version of December's Stick It Down double page sketch.  Come join the fun and create your own version of this versitile sketch.


I had two sets of photos for Halloween this year and this sketch worked perfectly for both.  My older son decided he wanted to do a fancy Jack-o-lantern, and the younger was not to be outdone.  On Halloween the 18-year old and his girlfriend volunteered to take his younger brother trick-or-treating.  So we had to document the before and after.   Here is my rendition:


I have a ton of My Mind's Eye Blackbird paper in my stash.  Must have purchased a stack at a sale at a convention!  It is perfect for the base layer.  The spider web was created with The Crafter's Workshop Spiderweb stencil, by inking the stencil with ink daubers and All Purpose Black Pearl Ink and then pressing it onto the paper.  The pumpkin glitter die cut sheet a Martha Stewart  Holidays paper from long ago.  I did a little creative trimming to use one sheet on both sides of the layout.  The photos are framed with black cardstock.  The title is Quickutz Abigail font.  I made two of these layouts, one for each son . . . I am really happy with the finished pages!

Saturday, November 25, 2017

Chocolate Donuts for Imagine's color of the month

Cocoa is the color of the month over at Imagine.  Instagram your own creation for the opportunity to be featured by Imagine! 


Chocolate donuts are simply the best, even better if they have Cocoa flavored frosting as well!  I used a new set of The Stamps of Life to create a few yummy looking donuts with different types of frosting.  Delicata Dark Brown Shimmer is embossed to create a shiny frosting on one donut.  The other donuts are stamped and embossed to create Radiant Neon Electric Pink sprinkles, and white frosting from white embossing powder.  Delicata Dark Brown Shimmer is applied with an ink blusher to give a shimmery frosting look. 

Imagine

Other
White cardstock
The Stamps of Life—Donut2stamp stamp and die sets
Sizzix Framelits Drop-Ins 560147

Friday, November 24, 2017

Take Ten Rooting for Succulents!

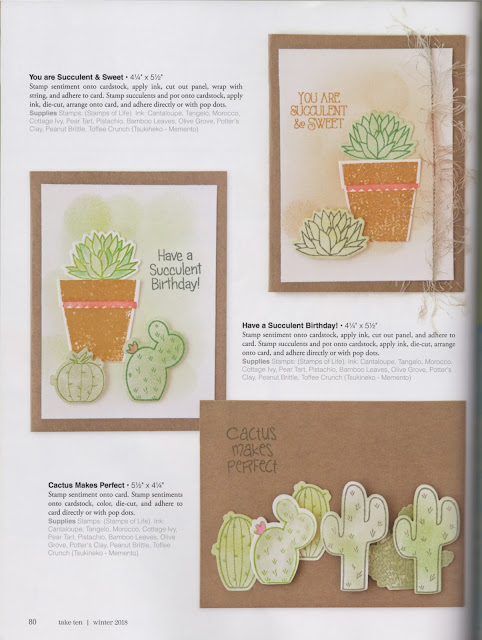
Can I just say I am over the moon excited to share that I have a THREE page spread in the newest issue of Take Ten!  One of my goals for 2017 was to submit for consideration of publication.  I followed through during the early months of 2017, and am very happy to have a series of cards published in the Dec/Jan/Feb issue of Stampington & Company's Take Ten.  I received my complimentary copy in the mail today.


All of the cards are made with The Stamps of Life Succulents2stamp and Imagine products.  I am so pleased to see these fun cards on the pages of a magazine!